Category: Main Dishes

Main Dishes on Decadently Fit

Crockpot Roast Chicken

FullSizeRender

Hellooooooo!  Yes, it’s been a long time since my last post and I hope you can forgive me.   Priorities changed and I had to shift focus for a little while.  Actually, my focus has shifted profusely!  I went back to school in March.  I will be a bachelor degree toting nurse by 2020, God willing.  Why the shift in my passion?  It hasn’t really.  I’ve always had a desire to help people, that is why this blog was started in the first place.  Being a nurse I will be able to help people on an entirely different level.  God gives us all desires and passions, and I believe the desire to become a nurse came directly from him.  So with the strength instilled in me by him I have maintained straight A’s so far and my family hasn’t taken too big of a hit.

I actually LOVE school.  I am a much better student at this point in my life than I ever was.  I am getting much more out of it this time, even the classes I am not so into, like Philosophy.  Ugh, that class was interesting to say the least.

As of today I start my chemistry and Anatomy classes.  I am not a math person so chemistry is going to challenge me, but I’ve taken Anatomy before and am so looking forward to dissecting everything!  I promise not to post pics on the blog of dissections, although I can’t say the same about my instagram.  You have been warned!

So, needless to say life is busy in our household.  But, eating and being healthy is still a priority to all of us.  I do NOT want to put on the freshmen 15, and want to continue to feed my brood in a healthy manner, no excuses.  So instead of the recipes you are used to on Decadently Fit, the recipes will now be super easy and quick, lots of crock pot ideas.

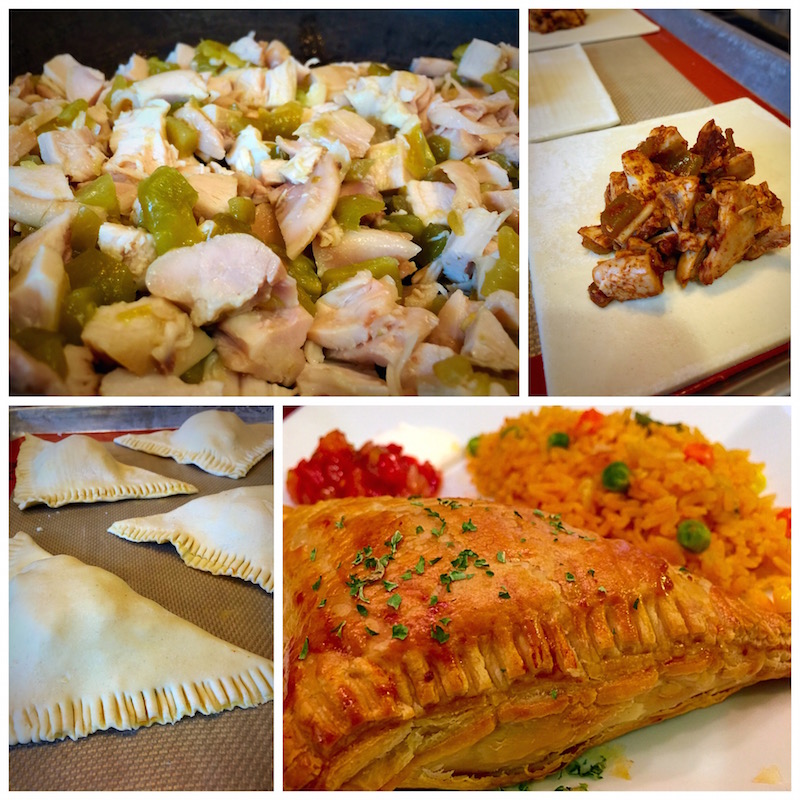
The recipe below is tonight’s dinner, crock pot roast chicken. It took me a matter of 10 minutes to prepare this dish.  For those with limited culinary knowledge you don’t have to be afraid of this dish, it’s beginner friendly.  I will be serving it will frozen organic broccoli and frozen organic brown rice.  Quick, easy, healthy, minimal clean up.

Cheers to new adventures, creating new goals and maintaining a healthy family!

5.0 from 3 reviews
Crockpot Roast Chicken
 
Author: 
Recipe type: Crockpot Recipe
Cuisine: American
Prep time: 
Cook time: 
Total time: 
Easy weeknight crockpot meal.
Ingredients
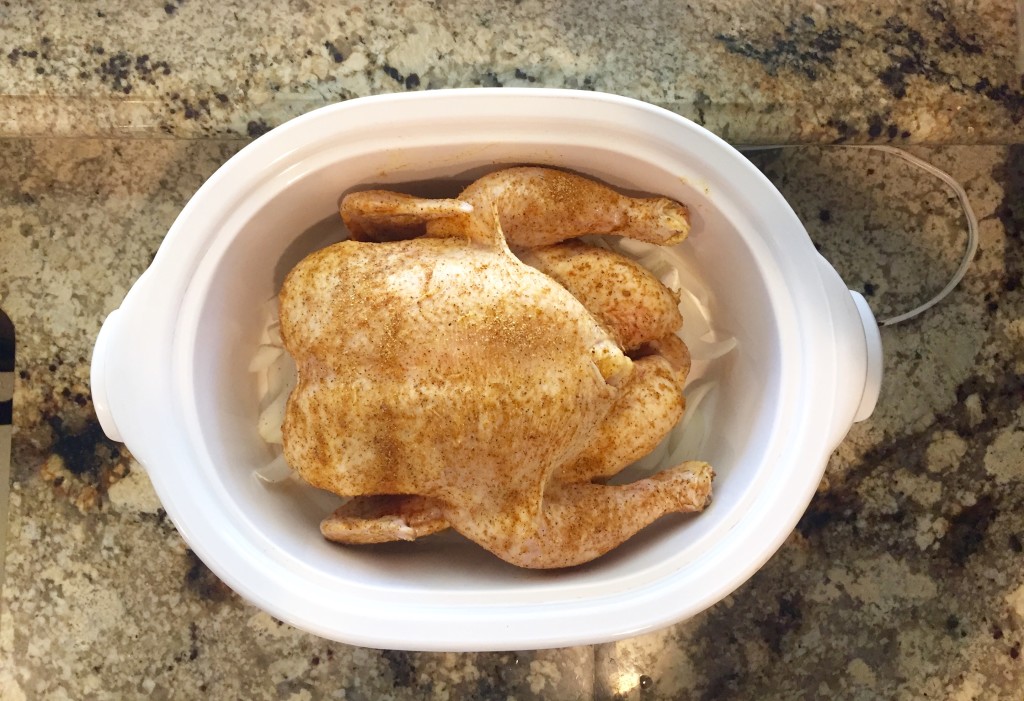
  • 1 5 lb. roasting whole chicken
  • 2 tsp. coarse sea salt
  • 2 teaspoons adobo seasoning
  • ½ teaspoon smoked paprika
  • 1 large onion, chopped
Instructions
  1. Combine the spices in a small bowl
  2. Remove the giblets from the chicken, rinse and pat dry with paper towels.
  3. Place chopped onion in the bottom of a 6 qt. crockpot
  4. Rub the chicken with the spices and set on top of the onion.
  5. Place the lid on the crockpot and cook on low for 4 - 8 hours or until a thermometer shows 165 degrees in the thigh.
  6. If you would like the skin crispier remove the chicken from the crockpot place on foil covered cookie sheet and broil the chicken for 2 to 5 minutes.
  7. Let rest for 10 minutes, then carve and serve.


Hatch Chili Quinoa Stuffed Zucchini – Plus a Giveaway!

Fresh Hatch Chiles_Fotor If you have been a reader of my blog for at least a year you know about the Hatch Chili.  If not, here is a quick history/biography of the only chili that can be purchased in three different heat scales, mild, medium and hot. a Rafflecopter giveaway

The Hatch Chili has a very short season, which starts in August and ends in September.  They are only grown in Hatch, New Mexico, where the climate is perfect for this species of chili.  The chilies resemble a poblano, but have a deeper flavor.  Whether used roasted, fresh or in powder form the chili goes well with so many flavor profiles. Hatch Chili Roasting IEFB_Fotor The smell of the roasted chills is pretty incredible though.  I should know that scent incredibly well after recently going to a Hatch Chili Roasting event at the Bristol Farms located in Palm Desert.  I was lucky enough to attend with my fellow IEFB friends, Sara from My Imperfect Kitchen and Natalie from The Devil Wears Parsley.  Sue from It’s Okay to Eat the Cupcake was there in spirit with us! Hatch Chili Salsas I tried Hatch Chili everything that day!  From savory dishes like, pizza, sushi, grilled cheese, salsa, macaroni and cheese, guacamole, and chorizo.  My sweet tooth was invited to the party with the juices, smoothies and cupcakes spiked withe versatile chili. Hatch Chilis Roasted_Fotor   I had never been to a Hatch Chili Roasting or a Bristol Farms before.  Both were worth the drive to the desert!  The smell of the hatch chilis wafted through the parking lot when we pulled up and filled the car on our drive home.  We bought a case and split it amongst the four of us.  I would highly recommend doing this.  Since the season is so short it’s one of the only ways to have access to them in the off season.  If you would like to find a roasting near you click here. IMG_3727_Fotor After you have purchased your chills make sure you peel and freeze them within 24 hours of the roasting.  I separated my 1/4 case into smaller freezer bags, flattened them, and stacked them in the freezer.  I left a portion fresh and have been eating them in eggs, soups, meat loaf and then came up with the recipe below with items I already had on hand. Hatch Zucchi_Fotor Hatch Chili Quinoa Stuffed Zucchini is a quick protein filled meal that satisfies.  The mild bite from the mixture of hatch chills and curry powder gives the zucchini a flavorful punch.  Low carb, vegetarian, gluten free, diabetic friendly and tastes amazing.  (recipe below) Want your own Hatch Chili Cook Book from the produce experts at Melissa’s Produce?  Enter to win your own copy here!  You may even win one of the signed copies from the author!

a Rafflecopter giveaway

Here are even more great hatch chili recipes from my friends:

Hatch Chili Breakfast Sausage from Natalie at The Devil Wears Parsley

HatchChileChickenSausage-Natalie

Hatch Chili Pesto from Sue at It’s Okay to Eat the Cupcake

Hatch Chile Pesto Sauce_Fotor

Hatch Chili & Chicken Pockets from Sara at My Imperfect Kitchen

HatchChile&ChickenPuffPastryPockets

4.8 from 4 reviews
Hatch Chili Quinoa Stuffed Zucchini - Plus a Giveaway!
 
Author: 
Recipe type: Main Dish
Ingredients
  • 4 zucchini, split in half
  • 2 cups cooked quinoa
  • 1 teaspoon curry powder
  • ½ cup greek yogurt
  • ½ teaspoon sea salt
  • ½ cup red onion, diced
  • 3 roasted hatch chilis, peeled, and diced
  • 8 tablespoons cheddar cheese (optional)
Instructions
  1. Preheat oven to 350 degrees.
  2. Remove the insides of the zucchini, leaving an edge all the way around the zucchini to hold in the filling. Roughly chop the insides and set aside in a medium size mixing bowl
  3. Saute the red onion in 1 tablespoon olive oil over medium heat for 5 minutes or until translucent.
  4. Add the red onion to the mixing bowl, along with the quinoa, curry, yogurt, salt, and chills. Mix to combine.
  5. Place the zucchini on a cookie sheet, then scoop the quinoa filling into each zucchini boat.
  6. Bake for 30 minutes, then top with cheese if desired. Bake another 5 minutes to melt cheese.
  7. Serve immediately.

 Disclosures:  All opinions in this post are my own.  Bristol Farms did not sponsor this post.  Melissa’s Produce has generously supplied the cookbooks in the giveaway, and hatch chili ingredients.  

Thai Zucchini Noodle Salad

RebekahSpicyAsianZucchiniNoodleSalad-2
photo credit: Natalie Wiser-Orozco

Sometimes it’s the simplest things in life that make your day.  A smile from someone, a cat purring loudly in your face or even food.  I hate to admit it but food makes my day quit often.  Lately I have been on a tirade with Thai food.

I can not get enough Thai food.  Curry, coconut milk, tamarind, spicy everything.  If I was stranded on a desert island I could eat Thai food the rest of my life.  Oh wait, isn’t Thailand a ton of islands?  I want to be deserted on any one of them.  Now.

In the meantime, I will have to live with making my own at home.

Since the weather has gone from quadrapolar (yes I made that up),  can’t decide what season to be, to I live in an oven hot, cold food is a must.  Cold Thai inspired food equals perfection right now.

Recently my Inland Empire Food Blogger posse came over to share their newest salad creations with me.  I am incredibly lucky to have such talented friends that make to die for food.  I brought this Asian beauty to the table, literally.

My addition was quick, refreshing, spicy, salty and slightly sweet.  You can add grilled chicken to the salad to make it a complete meal.  Whatever you do to this salad just make it.  The dressing is to die for and will quench any Thai cravings you have.  Since it’s low in carbs you can have as much as you want!  Dive in fork first!

Here are the links to the other great salads my friends brought:

Natalie from The Devil Wears Parsley made a Cuban Sandwich inspired salad.

EnsaladaCubano-14

Sue’s Italian inspired Salad from It’s Okay to Eat the Cupcake has home made pizza croutons!

Salad Overhead

Sara’s baja inspired Spicy Watermelon Salad made my mouth so happy, her recipe is posted on her blog My Imperfect Kitchen:

Sara Salad


Thai Zucchini Noodle Salad
 
Author: 
Nutrition Information
  • Serving size: 
  • Calories: 85
  • Fat: 3.5
  • Saturated fat: .6
  • Carbohydrates: 10
  • Sugar: 6.4
  • Sodium: 414
  • Fiber: 3.1
  • Protein: 3.9
  • Cholesterol: 0
Recipe type: Salad
Cuisine: Thai
Ingredients
  • 3 zucchini, spiralized or julienned into long spaghetti like strips ( I used a mandolin)
  • ¼ head of red cabbage, shredded
  • 1 large carrot, julienned
  • 2 tablespoons chopped cilantro
  • ¼ cup crushed roasted unsalted peanuts
  • grilled chicken (optional)
  • For the dressing:
  • 2 teaspoons fish sauce
  • 2 tablespoons tamari or low sodium soy sauce
  • 1 tablespoon honey
  • 2 cloves garlic, minced
  • ½ teaspoon red pepper flakes
  • 3 tablespoons rice wine vinegar
  • ½ teaspoon ground coriander
  • 1 tablespoon sesame oil
Instructions
  1. Whisk all dressing ingredients together and refrigerate for an hour.
  2. To assemble Salad:
  3. Layer the noodles on the bottom, then the cabbage, the carrots, the cilantro, and then the peanuts. Right before serving drizzle the dressing over the salad. For best results, mix dressing into the salad to coat evenly.


Shepherd’s Pie – Kerrygold Cheese & Butter Giveaway

SP Shephards Pie 2_Fotor Top of the morning’ to ya!  Or afternoon, not sure what time of day you are reading this, but this is one recipe you will want to make.  I started making this a few years ago as a solution to a dinner time problem.  One of us wanted healthy, the other wanted hearty.

My gluten-free Shepherd’s Pie became the solution to that problem. Although it’s undergone many makeovers since first conception of the dish, I have settled on this version as my favorite.  The best part is the loaded cauliflower mash that adorns the gluten-free chicken and veggie filling.  The mash is filled with Kerrygold unsalted butter and their Dubliner with Irish Stout.  This Shepherd’s Pie is the perfect healthy St. Patty’s day dinner.

If you read my last post you know that today is the LAST day to enter the Kerrygold Cheese & Butter gift basket worth an estimated value of $175!  Enter below!

a Rafflecopter giveaway

Disclosure:  I was not paid to develop this recipe or to express my opinion.  All opinions are my own.

Shepherd's Pie (gluten free)
 
Author: 
Nutrition Information
  • Serves: 6
  • Serving size: ⅙th
  • Calories: 219
  • Fat: 11
  • Saturated fat: 6.3
  • Carbohydrates: 12.5
  • Sugar: 3.4
  • Sodium: 523
  • Fiber: 2.4
  • Protein: 15.8
  • Cholesterol: 50
Recipe type: Healthy Comfort Food
Cuisine: Irish
Prep time: 
Cook time: 
Total time: 
Slimmed down version of Shepherd's Pie, full of chicken & vegetables, topped with a Dubliner Stout Cauliflower Mash.
Ingredients
  • Cauliflower Mash
  • 1 head of cauliflower, core removed and steamed
  • ⅓ c. crumbled Kerrygold Dubliner with Irish Stout Cheese
  • 2 tablespoons unsalted Kerrygold Butter
  • 1 teaspoon salt
  • ¼ teaspoon white pepper
  • Filling
  • 2 chicken breasts cut into one inch cubes
  • 1 tablespoon Kerrygold unsalted butter
  • 1 shallot, diced
  • 2 garlic cloves, minced
  • 10 ounces baby portobello mushrooms, sliced
  • 1 carrot, diced
  • ½ cup frozen peas
  • 1½ cups chicken broth
  • 1 tablespoon worcestershire sauce
  • 2 tablespoons arrowroot powder
  • 2 tablespoons chicken stock
  • ½ teaspoon dried thyme
  • sea salt and pepper to taste
Instructions
  1. Cauliflower Mash
  2. In a food processor pulse the cheese until it crumbles into very small pieces
  3. add in the rest of the ingredients and puree till smooth. Set aside
  4. Filling
  5. Preheat the oven to 425 degrees.
  6. Melt the butter in a large pot.
  7. Add the mushrooms and a few pinches of salt to the pot and cook on medium high heat for 3-5 minutes, or until the liquid from the mushrooms disappears.
  8. Add the shallots and garlic an sauté for another 2 - 3 minutes, or until shallots are softened.
  9. Add the peas and carrots, stir to combine.
  10. Stir in the chicken broth and worcestershire sauce
  11. In a small bowl stir together the 2 tablespoons of chicken broth and arrowroot till smooth.
  12. Reduce the heat to medium low and combine the arrowroot mixture with the veggie and chicken mixture stirring constantly, cooking for about 5 minutes on low heat until the mixture thickens. Season with salt and pepper.
  13. Pour the veggie chicken mixture into a medium sized baking dish (9X9).
  14. Top the veggie chicken mixture with the cauliflower mash, cover the filling completely.
  15. Bake for 20 -30 minutes or until the mixture begins to bubble.
  16. Let cool for 5 minutes before serving.

Short Rib Ragu over Roasted Cauliflower Steaks

caulifower ragu 6_Fotor 640

Everyone has a signature dish on stand by that they make for the people they love.  A dish that comes from their heart and warms their loved one’s soul.  It’s usually a dish that gave the chef a happy or joyous feeling that they wanted to share.  A silver lining on a bad day.

My silver lining dish of choice is a hearty beef ragu.  The first time I had it I was out for a girls night at a local Italian restaurant.  From my first bite I was in love.  That dinner was such a wonderful memory that I have forever tied the luscious flavor with that happy time.  Thus, my love dish was born.

The problem with my love/silver lining dish is that it’s not the healthiest in its original form.  There is a lot of fat laced into and on the outside of boneless beef ribs.  When you braise them the fat melds into every fiber of the meat and sauce.  Yes, it’s to die for, but to make it healthier I pull the outside fat completely off the ribs, leaving only the internal fat.  This cuts down the fat factor immensely.

cauliflower roasted 2_Fotor 640

Adding to the unhealthy factor, the original dish was served on a bed of orrechiette (ear shaped pasta).  Although the dish was perfection in this combination, the carbs and gluten aren’t always welcome at my dinner table.  Since cauliflower is one of my favorite cruciferous veggies, I chose to pair the chunky sauce with it.  I roasted olive oil spritzed cauliflower steaks on a pizza stone covered in a garlic herb seasoning.  I didn’t even miss the pasta.  The cauliflower had more flavor and the crunchy texture was a nice contrast to the luscious sauce.

The total meal comes in at only 283 calories.  I have no idea what the original meal nutrition stats are, but I can guarantee they would not be pretty.

Whatever your go to love dish is I hope your Valentines day is filled with love.  Not just on the 14th, but everyday.

5.0 from 1 reviews
Short Rib Ragu over Roasted Cauliflower Steaks
 
Author: 
Nutrition Information
  • Serving size: ⅙th
  • Calories: 283
  • Fat: 11
  • Saturated fat: 5
  • Unsaturated fat: .5
  • Trans fat: .4
  • Carbohydrates: 14.1
  • Sugar: 7
  • Sodium: 855
  • Fiber: 4
  • Protein: 7.4
  • Cholesterol: 22
Recipe type: Main Dish
Cuisine: American, Healthy
Slow Cooked Short Rib Ragu is ladled over roasted cauliflower.
Ingredients
  • For Caulifower Steaks
  • 1 head of cauliflower, washed and patted dry, outer leaves removed
  • Melissa's Produce "My Grinder" Organic Garlic & Herb Sea Salt
  • Olive Oil
  • For Short Rib Ragu
  • 1½ lbs of boneless beef ribs, visible fat removed
  • 1 carrot, peeled and diced
  • 2 celery ribs, diced
  • 1 brown onion, diced
  • 3 garlic cloves, minced
  • 2 tablespoons olive oil
  • 1 teaspoon sea salt
  • ½ teaspoon crushed red pepper
  • 1 tablespoon dried basil
  • ½ cup red wine (I used a cabernet)
  • 1 28 ounce can organic diced tomatoes
  • 1 15 ounce can organic diced tomatoes
  • 4 tablespoons organic tomato paste
  • 2 bay leaves
  • sea salt and pepper to taste
Instructions
  1. For Short Ribs
  2. Pre-heat oven to 325 degrees
  3. Pat the ribs to remove any moisture. Sprinkle with sea salt and pepper on all sides.
  4. Heat a large dutch oven over high heat, then add olive oil when hot.
  5. In 2 batches sear all sides of the ribs. Sear each side for about 2 minutes or until brown. If the meat sticks to the pan when you try to flip it, leave it on for another minute. Remove ribs to a nearby plate after all sides are seared.
  6. Add the onion, carrot, and celery, salt, red pepper and basil to the same pan the ribs were in. Saute for 5 minutes or until soft, stirring occasionally.
  7. Pour in the red wine and scrape all the brown bits off the bottom of the pan (a.k.a. degalze the pan). Reduce the wine by half, about 2 - 4 minutes.
  8. Add the tomatoes and bay leaves, combine well.
  9. Return the meat and the juices to the dutch oven submerging them in the tomato wine sauce.
  10. Put the lid on the dutch oven and cook in the oven for 2½ hours.
  11. Remove the meat from the sauce to a cutting board. Set aside.
  12. Using a hand blender or use a regular blender, pulse the sauce so that the veggies are coarsely pureed. There should be some texture left in the sauce.
  13. Return the meat back to the sauce and stir to combine.
  14. For the Caluiflower
  15. Preheat oven to 425 degrees
  16. Cut the head in 2 inch thick slices. The ends will not come off looking like steaks but you should get at least 2 steaks from one head.
  17. Spray each side of the cauliflower steaks and pieces with olive oil, and then spring both sides with Garlic and Herb Sea Salt.
  18. Place on a pizza stone or baking sheet.
  19. Roast for 20 minutes.
  20. Serve with ragu on top.


Spicy Basil Spaghetti Squash with Sun-dried Tomato

spagetti squash basil oil3_Fotor There are times when cooking dinner is seriously the last thing I want to do at the end of a busy day.  I would rather order a pizza and call it a day.  Ultimately I always regret that decision for many reasons.  First, because of the greasy s@#t storm it creates in my stomach.  Second, because my body just does not do well with that amount of dairy consumed at one time.  It’s a recipe for disaster.  Pun intended. Last night I was scrambling for a dinner idea.  I always keep whole wheat pasta and a jar of organic marinara sauce on hand for emergencies like this.  Only problem is that whole wheat pasta, although great for the boys is not what I want at the end of the day.  I prefer not to eat carbs at a time of day that I can’t burn them. After a quick scan I found a lonely spaghetti squash that was pleading for me to use it.  Normally I would just prepare the spaghetti squash for me, the whole wheat noodles for the kids and use the same sauce for both.  Only problem was that my back up jar had been partially used on tortilla pizzas a couple nights ago.  There was only enough for my two crazies.  So of course I gave them the sauce, the hangrys (hungry+angry=hangry) had already set in. spaghetti squash_Fotor What to do for me?  Fortunately for myself and now beneficial to all of you, I am an advanced pantry recipe developer.  Did you just raise your eye brows and wonder what the heck I was talking about? Basically, I can make something from nothing like nobody’s business.  I attribute it to living on tight budgets for most of my life.  It’s a great skill to possess.

Don’t worry though, as fancy as this recipe sounds, it sooooo simple to make.  Keeping it inline with my new simpler philosophy.  Either bake or microwave the divided squash, then pull the ‘noodles’ out.  Heat the Luna Olivo Basil Olive Oil till shimmering and add a clove of garlic.  Infuse the oil (just let the garlic sit in the hot oil) for a few minutes.  Remove the garlic, add the tomatoes, squash, and red pepper.  Add mozzarella on top.  Done.

You can add chicken or italian sausage for more protein, at that moment I was fine with the mozzarella.  It was quick, tasty, and healthy.  When I made it I served it in the empty spaghetti squash shell, saving me any extra dishes.  Serious bonus, considering I hate dishes. Simple.  Healthy.  Easy Clean up.  Delicious.  All good reasons to have this on standby for your next busy week night.

Disclosure:  I was not compensated for any portion of this post.  Luno Olivo sent me their delicious Basil infused Olive Oil.  I would absolutely suggest purchasing any of their products.  Superb quality, amazing flavor!  Click here to purchase their products.

5.0 from 1 reviews
Spicy Basil Spaghetti Squash with Sun-dried Tomato
 
Author: 
Nutrition Information
  • Serves: 2 servings
  • Serving size: ½ of meal
  • Calories: 319
  • Fat: 17.6
  • Saturated fat: 7.1
  • Carbohydrates: 27.5
  • Sugar: 11.8
  • Sodium: 246
  • Fiber: 6.3
  • Protein: 13.1
  • Cholesterol: 40
Recipe type: Main Dish
Prep time: 
Cook time: 
Total time: 
Simple weeknight healthy dish everyone should add into their rotation.
Ingredients
  • 1 small spaghetti squash
  • 1 whole garlic clove
  • ½ tablespoon Luna Olivo Basil Olive Oil
  • ¼ cup sun-dried tomatoes, not in oil
  • pinch of red pepper flakes
  • 4 oz. of fresh mozzarella cheese
  • pinch of sea salt
Instructions
  1. Prepare the spaghetti squash, one of two ways. 1. For microwave method: Split in half with a sharp knife. Place face down on a microwave safe plate. Pour ¼ cup of water on the bottom of the place and cover with plastic wrap. Microwave for 8 minutes. Let sit for 5 minutes. Remove from microwave with hot pads. With a fork pull the 'noodles' out of the squash. set aside. 2. For oven method: Split in half with sharp knife. Place face down on a foil covered baking sheet. Bake at 450 degrees for 30 -40 minutes until flesh can be pierced with a fork easily. Remove from oven and let cool till it is easy to handle. Remove 'noodles' from squash, set aside.
  2. Add the olive oil into a hot large sauté pan. Put the clove of garlic in the pan and let the garlic infuse the oil by swirling it around the oil for 2 - 3 minutes. Remove the garlic.
  3. Add the tomatoes and the red pepper flakes to the oil and sauté for 1 - 2 minutes.
  4. Add the spaghetti squash to the pan. Saute for 2 minutes and add salt. Toss the squash with the ingredients, then remove to two separate plates.
  5. Top each plate with half of mozzarella. Serve immediately.


Garlic Chili Black-Eyed Peas & Eggs

black eyed peas breakfast_Fotor

Happy New Year!  This is my first official recipe post of the year and the first one to show off my new philosophy. I am going for a more simple approach regarding recipes this year.  Quicker, simpler, cleaner.

We all have busy lives.  As mine has gotten perpetually busier I realized I haven’t had the time to make the recipes I was posting.  That’s a problem.

It’s not just the holidays, it’s the everyday busyness that starts the bad habits forming.  The “I don’t have time to make something right now so I am going to pick an unhealthy option” cycle.  So instead of complaining about the problem, I came up with a solution.  Stop complicating things.  Go the easy route and simplify the food I am making.  I am still getting the same result without the stress.

It’s a well know superstition that eating black-eyed peas in the New Year will bring you good luck.  My amazing friends at Melissa’s Produce recently sent me a lovely gift of black-eyed peas and their Clean Snax.  They know the way to my heart for sure.  Delicious, convenient, clean food.

cleansnacks_Fotor

The black-eyed peas come cooked.  There is nothing to do, but open the package, rinse them and break them apart.  In this dish I patted them dry with paper towels to prevent them from steaming in the pan. I didn’t want mushy peas.

This dish is perfect for a busy morning, especially after a great workout.  It comes together in a matter of minutes, about 10 to be exact.  It’s full of protein, fiber, and good fats.  Everything you need to rebuild muscle and level out your blood sugar.  In simple terms you will be fuller longer and give your body the nutrients it needs after working out.

I hope you are finding 2015 to be everything you hoped for.  Never forget you have the key to your destiny.  If you do the work you will see the results.  Don’t let excuses get in the way of your goal.  Find a solution to each excuse and nothing will stop you!  Happy New Year!

Click on the pictures below to buy these wonderful products.


Disclosure:  I was not compensated for writing this post. Melissa’s Produce supplied the black-eyed peas and clean snacks for my own use.  All opinions are my own.

Garlic Chili Black Eyed Peas & Eggs
 
Author: 
Nutrition Information
  • Serves: 2
  • Serving size: 2
  • Calories: 485
  • Fat: 26.6
  • Saturated fat: 13.8
  • Unsaturated fat: 1
  • Trans fat: 0
  • Carbohydrates: 33.6
  • Sugar: 15.9
  • Sodium: 618
  • Fiber: 10.7
  • Protein: 27.8
  • Cholesterol: 375
Recipe type: Breakfast
Prep time: 
Cook time: 
Total time: 
A hearty, protein filled breakfast that comes together in less than 10 minutes.
Ingredients
Instructions
  1. Mix together the ghee, garlic & herb salt, and chili powder
  2. Add the beans into the ghee mixture and combine thoroughly
  3. Heat a large skillet over medium-high heat. Add the beans when hot. Let the beans sit for two minutes, then stir, let sit another two minutes. Repeat for 8 minutes until the beans are heated through and are starting to brown slightly. Do not overcook. If the beans start popping pull off heat.
  4. In another pan, heat the final tablespoon of ghee over medium heat till melted. Spread over pan and fry eggs in ghee till desired temperature is reached. You can add a lid to steam the top of the eggs to cook faster.
  5. Serve two eggs on top of ½ of the beans.


My Ultimate Sandwich Creation- Organic Oroweat Bread Giveaway

sandwich orowheat 1_Fotor

If you follow my blog posts on a regular basis you know that I am super picky about what I put in my body.  I like to eat organic whenever possible, especially when it comes to products/ingredients that are notoriously GMO (genetically modified) or filled with preservatives.

Oroweat recently asked me to review their line of organic breads and come up with an ultimate sandwich.  Even though they sent me coupons to try the bread and a gift card to buy ingredients for an ultimate sandwich, it was a no brainer to review the bread.  Not only is this bread already a staple in our household, it has been approved by my pickiest eaters, and more importantly by me.

oroweat_organic_breads_bkg_Fotor

The bread comes in two varieties, Grains & Seeds and Whole Wheat.  Both are fantastic, and made with all USDA certified organic ingredients.  *There are only 17g of carbs in each slice (, making it friendly to my carb counters.  *No high fructose corn syrup, and 3g of fiber.  The slices have a wonderful texture and hearty in size.  Best of all I buy it at my nearby Target.  No need to go to a specialty store to buy a healthy, delicious bread option.  Click here to find a store near you!

I was challenged to create an ultimate sandwich using the organic line of breads.  I love my sandwiches.  Since lunch is when I eat the highest amount of carbs, sandwiches are usually what I gravitate to.  They fill me up and keep me happy till snack time around 3 p.m.

sandwich open face_Fotor

I personally am super sick of turkey sandwiches at this point.  I know the barrage of turkey is happening again in a couple of weeks, so I decided to take another route.  After much thought, I decided to go with a Greek Chicken Salad Sandwich.

I’m so glad I went with a Mediterranean inspired sandwich.  It was easy to make and woke up my taste buds. This sandwich is a protein powerhouse with chicken, hummus and greek yogurt based tzatziki sauce.  The addition of cucumbers, roasted red bell peppers and spinach make the sandwich crunchy and nutrient dense.

sandwich with spinach_Fotor

In case you are wondering, this sandwich is an awesome addition to any lunch box.  I made one, stuck it in my sandwich container and left it in the fridge.  Four hours later when I went to eat it, it was exactly the same as the one I made fresh.  That is huge to me, I strongly dislike soggy sandwiches.

sandwich orowheat 3_Fotor

Want to recreate my mediterranean masterpiece?  Follow the recipe below.  Want to win your own coupons and gift card from Oroweat?  Of course you do!  To follow Oroweat on Facebook click here.

a Rafflecopter giveaway

______________________________

Recipe

6 slices of Oroweat Organic Whole Wheat Bread

Greek Chicken Salad on Organic Oroweat Bread

2 roasted chicken breasts, cubed (great use for leftovers!)

1/3 cup roasted red bell pepper, diced

1/2 cup cucumber, diced

1/2 cup tzatziki sauce, (see recipe below or used organic store-bought)

6 tablespoon hummus

baby spinach

Tzatziki Sauce

1 cup 0% organic greek yogurt

1 tablespoon dried dill weed

1 tablespoon organic lemon juice

1 tablespoon organic olive oil

3 garlic organic garlic cloves, minced

sea salt and pepper to taste

Method

1.  Make the tzatziki sauce by mixing all the ingredients together and chilling for at least 4     hours.

2.  Mix together 1/2 cup of the tzatziki sauce with the chicken, bell peppers, and cucumber.

3.  To assemble sandwich place 1 tablespoon of hummus on one side of bread.  Place about 1/4 cup of the chicken salad on one slice of bread, top with a handful of spinach, and top with the another slice of bread.  Serve immediately or save for lunch time.

Disclosure:  I was given 3 coupons for 1 loaf of Oroweat Organic bread and a $25 gift card to purchase ingredients related to my sandwich creation.  All opinions are my own.  All facts regarding the bread are directly from Oroweat.

*Nutrition information given was taken directly from the Whole Wheat bread package.


Potato Leek Soup with Bacon – DYP Book Review – PLUS Giveaway!

potato leek 2_FotorPotatoes notoriously get a bad rap.  Dieters exclude them from their menu plans, grouping them with the bad carbs such as the ones in bread.  Casting them aside afraid they will add more unwanted pounds.

The round, eye filled root vegetable has been type cast as the evil villain due to its role as the greasy french fry and calorie dense chip.  I’m here to tell you that the poor potato has been misunderstood.  His good qualities need to be highlighted and celebrated by the health seeker. Potatoes are high in fiber, vitamin c,  B-complex, and magnesium.  They can lower blood pressure, cholesterol, improve brain function, prevent kidney stone formation, protect against cancer, and boost antioxidants.

With that being said, there are so many different types, how is one to know which to use in a potato salad versus a stew.  Well, let me make it really easy for you.  Bake a russet and use Dutch Yellow Potatoes (DYPs) in everything else.  It’s really that simple. 1Baby Dutch Yellow 24 oz_Fotor Dutch Yellow Potatoes are so versatile they work for just about everything, even dessert.  On November 18th, I was at the book launch at Melissa’s Produce for their latest cookbook DYPs The Perfect Everyday Cookbook.  Since the DYP is exclusive to Melissa’s Produce it was only natural for them to compile a book full of the best recipes for the golden tuber.

I learned some interesting facts about potatoes at the event.  For instance, did you know that if a potato has a green hue to it you should not eat it.  The green hue is a warning sign that the potatoes have gone bad.  Amazingly, the DYP will not ever get the green hue, due to their extraordinarily long shelf life.  That fact is important considering the normal harvest time is August to October.  The potatoes are stored in giant temperature climate-controlled storage rooms for the rest of the year where they are harvested in Idaho.

DYPs are the most versatile potato because of their waxy texture and edible skin.  They cook quickly, about 6 – 10 minutes and won’t fall apart and get mushy.  It’s hard to over cook these adorable little guys.  I added them to my Pork Chili verde, simmered them for an hour, and they were perfectly cooked.  I used the Pee Wee size DYP for the chili, so there was zero prep before adding them into the green saucy goodness.  Look for the recipe in an upcoming post!

pb cookies_Fotor

I have to encourage you to try a potato based dessert.  Especially the Gluten-Free Peanut Butter Cookie Sandwiches (pg. 261).  It’s no secret that I love peanut butter. These cookies were to die for!  I would have never thought to use potatoes as a gluten-free option in a dessert.  Well played Melissa’s!  I may have snuck a lot of them out the door that day.  I only shared one.

Whether you mash, roast, use them in a salad or dessert, you should keep always keep DYPs around.  I see them in my local Von’s year round.  Chances are they are in your local grocery store as well.

Yes, potatoes have carbs, but they are good carbs.  Carbs that if you are working out, you need as fuel.  They are a clean fuel that your body knows how to process.  Yes, you should eat them in moderation.  But, they are what I call happy carbs.  They are satiating so you actually have to eat fewer of them to feel full.

To give you a taste, pun intended, here is one of my favorite recipes from the DYP cookbook, DYP and Leek Soup.  Not only is it the simplest soup recipe I have ever come across, it’s so luscious and comforting.  Not to mention it’s also topped with crispy bacon.  To die for.

If you are interested in learning more about the perfect potato and how to use them in every season, click here to purchase this incredible DYP cookbook.  OR enter my giveaway to receive the book and a bag of potatoes!  You can enter in the box below (or if the box does not come up click on the rafflecopter link)!

a Rafflecopter giveaway

5.0 from 1 reviews
Potato Leek Soup with Bacon - DYP Book Review - PLUS Giveaway!
 
Author: 
Recipe type: Soup
Prep time: 
Cook time: 
Total time: 
Ingredients
  • 1½ cups DYPs, diced small
  • 1 package Melissa's Belgian Style Leeks, sliced lengthwise, then cut crosswise into 1 inch pieces (about 2 leeks)
  • 2 tablespoons butter
  • 2 cups water
  • 2 cups vegetable or chicken broth, plus more for thinning
  • ¾ teaspoon sea salt
  • white pepper to taste
  • 3 slices thick cut bacon, cooked and crumbled
Instructions
  1. Place the DYPs in a bowl and cover with water to prevent discoloration.
  2. Set a large stock pot over low heat and add butter. Add the leeks and cook, stirring occasionally, until softened. Drain the DYPs and add them to the leeks, along with water and the broth, sea salt, and white pepper.
  3. Increase heat to high and bring to a boil. Cover and reduce the heat to a simmer. Cook for 30 minutes, or until the DYPs are very soft.
  4. Pour the soup mixture into a blender, in batches if needed, and puree until smooth. (Be careful with hot liquids in blenders). Return the pureed soup to the pan and add broth to reach the desired consistency. Continue to cook over low heat till heated throughly.
  5. Serve in bowls topped with bacon.

Disclaimer:  I was not paid to promote or sponsor this post.  I was given a bag of DYPs and the DYP Cookbook from Melissa’s Produce.  All opinions are my own.   Please see disclaimer in the giveaway for details regarding to the prize and details of the contest.

Creamy Tomato Basil Soup

vampire blood

There are so many reasons I love fall.  The cooler weather.  The sporadic but present Southern California rain.  The Halloween candy bags filled with Reese’s Peanut Butter cups left for me to steal from my own children.  Yes, I steal candy from my children, don’t judge, you know you do it too.

My absolute favorite part of fall is the ability to make soup and grilled cheese for dinner without breaking out in an unattractive sweat.  Yes, that is important.  No one wants to start eating a hot bowl of creamy tomato soup and start sweating into it.  Yuck!

I am sure you are wondering how in the world do I eat tomato soup and grilled cheese while still making it healthy.  I do and don’t at the same time.  Yes, very contradictory.

As I mentioned in my last post, all of October, and now into November, I am eating all unprocessed foods.  I was eating mostly ‘clean’ foods before, but I still consume a lot of processed healthy and unhealthy foods.  I didn’t realize the amount of processed foods I was putting into my body until I completely took them out.

In the October Unprocessed challenge I didn’t eat anything I couldn’t make in my kitchen.  I made tortillas for the first time and loved them!  They were thicker than store-bought, but incredible.  I made wheat bread (from veganbaking.net) for my kid’s school lunches.  They went crazy for it because it was pretty much the tastiest, healthy wheat bread we have ever had.

wheat bread_Fotor

It was hard at times to keep on the unprocessed route.  I ate more peanut butter than I ever have in my entire life to fuel myself.  I love me some PB so it was fine by me.   I have never felt better in my life.  I have never had more definition and fewer headaches.  I never post ‘progress’ pictures, but I felt this time it was appropriate.  This is what eating unprocessed for 30 days can do:

bekah unprocessed

I’m pretty proud of myself!  I’m actually starting to see ab muscles!

Because I was making everything unprocessed, some nights I was tired of cooking by the end of the day.  Plus I had a lot of events that I was attending that needed new recipes or required me to cook.  One night I was over it.  I wanted something simple.  So I grabbed one of the home-made loaves of whole wheat bread, some Kerrygold Dubliner cheese, roasted jalapeños and Kerrygold butter.  The marriage of these ingredients created a melty, crunchy grilled cheese baby that I dipped into a pool of creamy tomato soup.

I loved the combo so much that I brought it to share at my monthly IEFB (Inland Empire Food Bloggers) meeting at fellow member Natalie Orozco’s (The Devil Wears Parlsey) house.  Of course I had to dress it up for the event, since our meeting was a Halloween theme.  Vampire blood test tube shots with Frankenstein and Bat grilled cheese fit in nicely among my fellow member’s awesome contributions.

choco bones myimp_Collage

Top:  Silly Cupcakes from My Imperfect Kitchen, middle left:  Autumn Harvest Croissants from It’s Okay to Eat the Cupcake, middle middle:  Meatloaf Skulls from The Devil Wears Parsley, middle right: Vegan Pumpkin Chocolate Chip Cookies, bottom:  Halloween Cookies with assorted frosting from The Devil Wears Parsley.

I hope you all had a healthy and fun Halloween.  Do those two words even go in the same sentence with Halloween?  Sure, why not?  Even if they don’t I hope I have inspired you to take an unprocessed challenge of your own.  It doesn’t have to mean only fruits and vegetables.  Just make your own clean foods and see what changes take place.  I dare you.


Disclosure:  I was not compensated for any portion of this post.  The Kerrygold cheese and butter was supplied to me by Kerrygold.  All opinions and ideas are my own unless otherwise stated.

Dairy Free Creamy Tomato Basil Soup
 
Author: 
Nutrition Information
  • Serves: 4-6 servings
  • Serving size: 1 cup
  • Calories: 129
  • Fat: 6.8
  • Saturated fat: .9
  • Carbohydrates: 13.2
  • Sugar: 7.9
  • Sodium: 977
  • Fiber: 3.8
  • Protein: 4.8
Recipe type: Soup
Prep time: 
Cook time: 
Total time: 
Adapted from Nordstrom Cafe's Tomato Basil Soup A hearty tomato soup that will stand up to your pickiest grilled cheese accompaniment.
Ingredients
  • 3 tablespoons olive oil
  • 4 large carrots, peeled and diced
  • 1 large onion, diced
  • 1 tablespoon dried basil
  • 3, 28 ounce cans organic diced tomatoes
  • 1 quart chicken stock (preferably homemade)
  • salt and pepper to taste
Instructions
  1. In a large, heavy saucepan, heat the olive oil over medium-high heat. Add carrot and onion and cook until beginning to soften, 10 minutes, then add basil and cook until vegetables are completely soft, about 5 minutes more.
  2. Add tomatoes and broth, bring to a boil, then reduce heat and simmer 30 to 45 minutes.
  3. Allow the soup to cool somewhat, then purée until smooth in a blender or food processor or using an immersion blender.
  4. Season to taste with salt and pepper, and serve warm.